Today’s must-have has to do with one of my fave topics– nail art. Nail art is one of the most simple yet fun ways to show a whole lotta personality and style in such a confined and minimal portion of your body. When I went to Vegas in August for the MAGIC convention, I came across this beyond nail art vendor called Scratch that practically flipped my world upside down. Florals in different shapes and colors you want? You can have. Watermelons that look so good that you want to eat off your nails? Yup, you can have that too. How about the impossible– Despicable Me Minions on each finger? Don’t worry, they’re one step ahead of you and have that handled as well.
Scratch was born from the simple idea of loving nail art as much as we do. But the difference with them is that unlike the same, old, and boring nail wrap designs you find in drugstores, Scratch wanted to make things that were cool, different, fun and unique. They believed that if they could create something that promotes and creates creativity and connecting talented artists with their communities, they could make something bigger than just being another nail wrap company. So what Scratch does every month is team up with some of the most talented artists, designers, and bloggers to create new, fun and different collections and designs. Once that collection goes up every month, you have the chance to buy it before it sells out. And once it’s gone, it’s gone! Creating a fanbase and urgency to be one of the few cool and connected with this super exclusive design, Scratch achieves the ability for you to stand out against your nail loving colleagues. With the super affordable price of just $12 per design, these babies will get people talking as soon as they lay eyes on your nails.
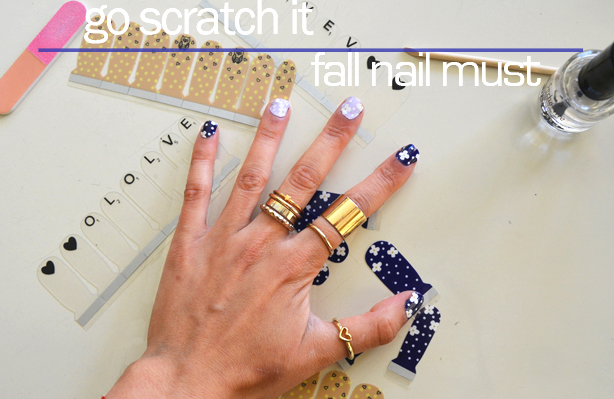
But for those of you who have never done nail stickers before, I always hear “ugh, but it seems so difficult. I’d rather just get my nails painted.” Well Fashionlainers, in fact, it’s actually not that difficult at all! Using last month’s featured artist, I show below the 7 simple steps you need to take to be your own DIY nail art extraordinaire. And if you haven’t you haven’t checked out this month’s featured artist, let me tell you, you will die instantly because I am. Get it before they’re all sold out!

Choose a nail design!
Probably the hardest part of this whole thing will be deciding which of the cute designs you want to go with for your look. I loved them all so much that I was about to go with all three of them!

Peel the front side off
Once you decide which look you want to go with (I decided on the florals for this time around), you start off by peeling away!

Gotta peel the back side too!
There are two sides that need to be peeled off in order to start going, so don’t forget to peel the front AND back stickers off.

Place sticker on appropriate nail
Each sticker is created with the idea that it is approximately supposed to fit a certain nail. So as you’re peeling away and getting ready to place, know which finger you think it would be perfect for placing.

Use the stick!
Once you’ve placed the sticker, use the wooden stick that’s given to you with the package to mold the sticker to your nail; this will help you adjust/trim the design with your stick to make the perfect nail fit.

File away
I like to use a nail file to help me with trimming and perfecting the sticker, so grab a nail file if you have and start filing off the excess.

Top it off
Once your nails are all done, go back with your fave top coat (mine’s Seche Vite) and cover your masterpieces up as if you would with any other of your fave nail creations.

And… voila! You’re done! How simple was that?


