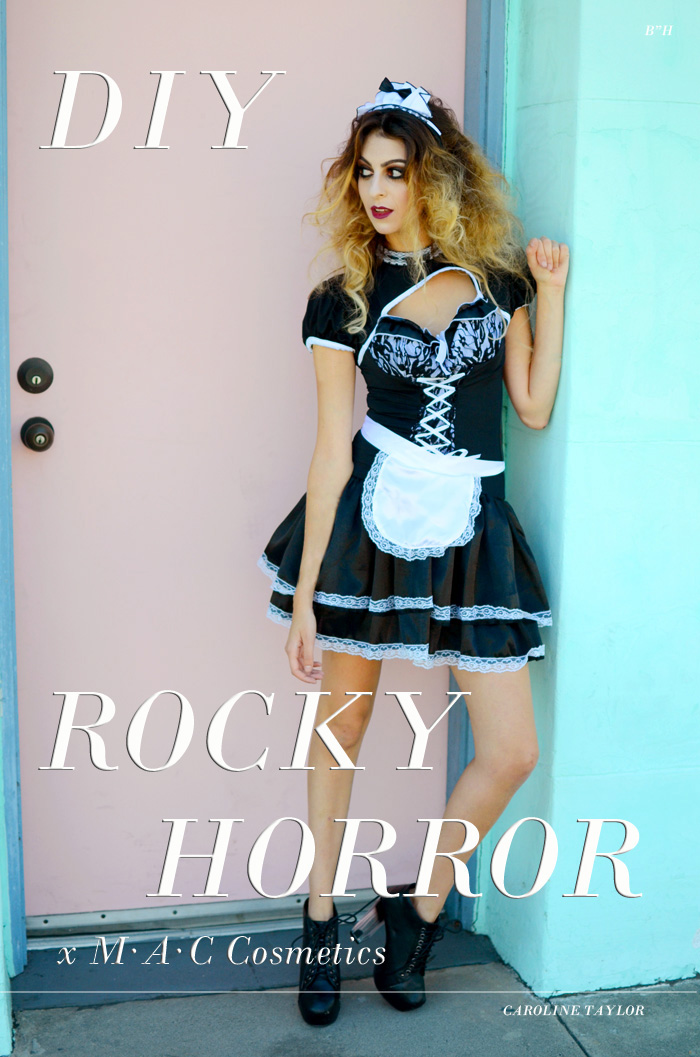
But before we get all carried away about makeup and wardrobe, first thing’s first– the hair! Heading to my go-to hair spot for all necessary momentous occasions from weddings to Halloween, I went off to DryBar (also to me known as actually the happiest place on earth) to kick off my Magenta transformation

1. Magenta’s hair in the movie is big, curly and crazy, so it was all about maintaining that look and style. After rinsing your hair and drying it, it’s first all about making the hair as hot as possible when blow drying. But from there, the key is to cool it down as fast as possible immediately afterwards. Since we’re going for a voluminous look, it doesn’t need to be nicely blow-dried– the more volume and tease the better! After done teasing the hair with the blow dryer, you need to start to slowly roll up strands into curls. Note: this all has to be in fast motions as you want to the hair still hot as you’re curling it up.
2. After done curling all the hair, leave it up there for a few minutes so it stays and cools down. Once settled in, pull the pins in your hair out to get those Shirley Temple-esque tight curls. From there, you need to go back in and start pulling and teasing the curls from the scalp up to make them the curls loose and give it that freeing afro-esque look. And voila! You and your crazy Magenta hair are ready to go!

Now off to makeup! Heading to the latest and greatest installment of the M·A·C Cosmetics stores in Los Angeles, I went to visit the new M·A·C North Beverly store in Beverly Hills where I met up again with my all-time favorite makeup extraordinaire Gregory Arlt (remember him from my Coachella makeup must-haves post?). Makeup professional to the stars like Gwen Stefani and Dita Von Teese, Gregory knows a thing or two about the importance of a good black eyeliner, so we were both ready and super excited to go with this look! At the M·A·C North Beverly store they have a private room in the back for makeup appointments which was everything! You can play your own music and feel relaxed and detached from the hustle and bustle of the shoppers throughout the store.

3. Start by creating the base of the pale face with the Studio Sculpt SP15 Foundation. When you’re doing a pale white foundation, you have to make sure you’re blending it in well, not streaky. (And the great thing about this is that you don’t need concealer!). Make sure you also white out the lips along the way as well as you’re going to want to remove all coloring from there too.
4. As the foundation is still “wet” and settling in, you’re going to set it in with a cover– patting it onto the skin with a big fluffy brush. The cover we used is the palest one of the M·A·C products — ‘Studio Fix’ NW10. (The best part about this is that it’s going to stay on all night!) After you do a layer, grab a medium fluffy brush to set everything in and smooth out any cracks on your face that may have popped up when applying on the foundation.

5. Continue on the face by creating some contour and highlight with the Rocky Horror Sculpt and Shape Powder. Starting with the lighter color, use a fluffy brush to start highlighting the highlights of your face which will bring out the bone structures and features like your chin and under your nose. Then with a tapered brush, start doing some of the contour portions including bringing out the cheekbones.


6. Now onto the eyes! Since we pale’d out the whole face, the foundation will inevitably get onto your eyebrows as well so now go back in and add a little bit of color and fill to your eyebrows to help keep them standing out. Then for the eyes, use a Quite Natural Pro Longwear Paint Pot with a Number 249 brush to give that warm tone that Magenta has with her eyelids in the movie (this will be your secret weapon to keeping your makeup on all night!). Spread this all over the eyelid and giving it a round shape since Magenta’s eyes are very round in the movie.

7. To really highlight the eyelid area right under the brow, grab some Crystal Avalanche eyeshadow to add a little nice pop. Then from the Rocky Horror RIFF-RIFF Eye Palette, grab some of the Blackberry color to help blend all the eye makeup together and soften the edges.

8. Naturally, as I’m an eye-liner fanatic– onto my favorite part! Lay on thick the Blackground Pro Longwear Paint Pot to the top of your eyes to keep the depth.

9. Magenta’s eyelashes are really “lashy” as we’d like to say, so once your eyeliner sets in, go ahead and curl your lashes and then from there, go in and load up with mascara.

10. Continue on with doing the black liner with the Blackground Pro Longwear Paint Pot again to the bottom of your eyes along with the 211 Pointed Liner Brush (the 210 brush works well also if you want a little more control). Note: the trick is to go thicker in the middle with the black and thinner towards to outside to eye to keep that round shape of the eyes! Then go back in with an angled brushed and start mixing a little bit of the Blackberry and some Carbon to the ends to blend it all and make your eyes a little less diffused and more smokey.

DYING OVER THIS LOOK ALREADY!

11. Time for the lashes! Magenta’s eyelashes are stringy and super “lashy” as mentioned earlier, so don’t be afraid to go all out with the extension lashes! The eyelashes we chose are dark brown, so the first thing you have to do is paint them black. For the bottom eyelashes, we went with the 33 Lashes and grabbed the 263 angle brush along with the Blacktrack Fluidline to transform the lashes to black. Once you’re done painting and blacking it up, grab a pair of tweezers for the glueing process and grab some black eyeliner glue (you can get at any drugstore) and glue the lashes on. You don’t need a lot of glue, but once you put it on your eyes (right under your eyelashes) let it dry for 30 seconds. Once dry, repeat the same steps for the top lashes with the 35 Lash which typically for everyday use would be a little crazy, but for Magenta is perfection!


12. Lips time! Grab the Vino Lip Pencil which is that perfect gothic purpley- red. Magenta’s lip shape was a blend between round and pointy so start lining your lips to create that in between shape until you fill in most of your mouth. Then grab your lip brush and start blending in the coloring on your mouth to make it smooth. From there, layer on the Rocky Horror FrankNFurter lipstick which is a deep brick-red-purple to make it blend in perfectly.

13. Now that your eyelashes have settled in, go back in and add a layer of mascara to them for perfection and to make them really show!

14. Last but certainly not least, every girl NEEDS some bling for every Halloween outfit, so who can forget Magenta’s nose piercing? Get a little Swarovski crystal and glue it onto your nose with some clear eyelash glue and viola, you’re ready to go!


To help with assistance and additional imagery, I’ve added a face chart of Magenta’s makeup below to help you out! Note: Gregory and I did some alternate choices for some of the steps than what is noted below.
Also, if you want a professional to help you do this look, set up an appointment with your closest M·A·C store (including the North Beverly location) and they can help you recreate this whole look (or another Halloween costume you have in mind)!

Now onto the final ingredient– the wardrobe! Teaming up with my go-to costume source for all things Halloween, the final touch was of course the outfit which came from AMI Clubwear. (Use my code AFF40 at checkout and you can get 40% off!). And now I present to you— MAGENTA!


